The world is increasingly connected, and at the heart of this revolution lies the Internet of Things (IoT). From smart homes to industrial sensors, IoT devices are everywhere, generating vast amounts of data and performing critical tasks. But what happens when you need to manage, monitor, or update these devices remotely? The answer often involves secure remote access, and for many developers, hobbyists, and IT professionals, mastering remoteiot web ssh download ubuntu is the key. This comprehensive guide will demystify the process, offering practical steps and insights into securely managing your IoT ecosystem.
Understanding how to securely access your IoT devices via SSH on Ubuntu can unlock a world of possibilities, providing unparalleled control and flexibility. Whether you're deploying a fleet of Raspberry Pis, managing industrial sensors, or simply experimenting with home automation, the ability to connect, troubleshoot, and transfer files remotely is indispensable. This article will guide you through downloading, setting up, and utilizing SSH for remote IoT monitoring on platforms like Raspberry Pi, Ubuntu, and Windows, ensuring your projects are both powerful and protected.
Table of Contents
- The Growing Need for Remote IoT Monitoring
- Why SSH is the Cornerstone of IoT Security
- Ubuntu: The Premier OS for IoT Devices
- Setting Up SSH on Your Ubuntu IoT Device
- Accessing Your IoT Device Remotely
- Web-Based SSH Solutions for IoT
- Visual Studio Code Server for Remote IoT Development
- Troubleshooting Common SSH Issues in IoT Environments
- Conclusion: Mastering Remote IoT Monitoring
The Growing Need for Remote IoT Monitoring
The Internet of Things (IoT) has rapidly transformed various industries, from agriculture to healthcare, smart cities to manufacturing. Devices are becoming smarter, more interconnected, and increasingly deployed in remote or hard-to-reach locations. This widespread adoption brings with it a critical challenge: how do you manage, maintain, and interact with these devices once they are deployed? Physically visiting each device for updates, troubleshooting, or data retrieval is often impractical, costly, and sometimes impossible. This is where remote IoT monitoring becomes not just a convenience, but a necessity. Effective remote monitoring allows for proactive maintenance, real-time data collection, and swift problem resolution, minimizing downtime and maximizing efficiency. Imagine a network of environmental sensors spread across a vast agricultural field. Without remote access, checking each sensor's status or updating its firmware would be a monumental task. Similarly, in industrial settings, monitoring machinery in hazardous environments remotely ensures worker safety and operational continuity. The ability to securely access these devices, transfer files, and execute commands from anywhere in the world is fundamental to realizing the full potential of IoT. This is precisely why understanding robust tools like SSH for remoteiot web ssh download ubuntu setups is paramount.Why SSH is the Cornerstone of IoT Security
When it comes to remote access, security is not an option; it's a fundamental requirement, especially for IoT devices that might handle sensitive data or control critical infrastructure. This is where Secure Shell (SSH) steps in as the undisputed champion. OpenSSH is the premier connectivity tool for remote login with the SSH protocol. It encrypts all traffic to eliminate eavesdropping, connection hijacking, and other attacks. This robust encryption means that your data, commands, and credentials are protected as they travel across potentially insecure networks, such as the internet. Beyond encryption, SSH offers several other features that make it ideal for IoT environments:- Authentication: SSH supports various strong authentication methods, including password-based and, more securely, public-key authentication. Public-key authentication is highly recommended for IoT devices as it removes the need to store passwords on the device and is far more resistant to brute-force attacks.
- Port Forwarding/Tunneling: SSH can create secure tunnels for other network services, allowing you to securely access services running on your IoT device that might not otherwise be exposed to the internet.
- File Transfer: Protocols like SCP (Secure Copy Protocol) and SFTP (SSH File Transfer Protocol) are built on top of SSH, enabling secure and efficient file transfers to and from your IoT devices. This is invaluable for deploying software updates, retrieving log files, or sending configuration changes.
- Remote Command Execution: You can execute commands directly on your remote IoT device as if you were sitting right in front of it, facilitating diagnostics, maintenance, and automation.
Ubuntu: The Premier OS for IoT Devices
Choosing the right operating system for your IoT devices is a crucial decision that impacts performance, security, and ease of management. Ubuntu stands out as a leading contender, offering a modern, open-source Linux operating system specifically tailored for the enterprise server, desktop, cloud, and IoT. Its robust nature, extensive community support, and a vast repository of software packages make it an excellent choice for a wide range of IoT applications, from simple sensors to complex edge computing gateways. Downloading and installing Ubuntu on IoT devices can further enhance their capabilities, providing a powerful, flexible, and secure foundation. Ubuntu Core, in particular, is designed for embedded and IoT devices, offering transactional updates, app isolation via Snap packages, and a minimal footprint. This makes it ideal for devices with limited resources, ensuring stability and reducing the attack surface. Key advantages of using Ubuntu for IoT:- Open Source and Free: Reduces development and deployment costs.
- Security: Regular security updates and a strong focus on secure boot, app isolation, and kernel hardening.
- Scalability: From small single-board computers like the Raspberry Pi to powerful industrial PCs, Ubuntu scales to meet diverse hardware requirements.
- Developer Friendly: A familiar environment for developers, with extensive documentation and tools.
- Ecosystem: Access to a rich ecosystem of libraries, frameworks, and development tools, simplifying application development and deployment.
Setting Up SSH on Your Ubuntu IoT Device
Before you can remotely access your Ubuntu-powered IoT device, you need to ensure SSH is properly set up and configured. This involves a few straightforward steps, but paying attention to security best practices is crucial to protect your device from unauthorized access. This article will guide you through downloading, setting up, and utilizing SSH for remote IoT monitoring on platforms like Raspberry Pi, Ubuntu, and Windows, and this section focuses on the device-side setup.Prerequisites for SSH Setup
Before you begin, ensure you have:- An Ubuntu-powered IoT device (e.g., Raspberry Pi with Ubuntu Server, or any device running Ubuntu Core/Desktop).
- Physical access to the device (initially, for setup).
- A stable internet connection for the device to download necessary packages.
- Basic command-line familiarity.
Installing OpenSSH Server
OpenSSH is the standard SSH implementation for Linux. Most Ubuntu installations, especially server versions, might have OpenSSH client pre-installed, but you need the server component to allow incoming SSH connections. 1. **Update Package List:** It's always a good practice to update your package list before installing new software.sudo apt updatesudo apt install openssh-serversudo systemctl status sshsudo ufw allow sshsudo ufw enablesudo ufw statusConfiguring SSH for Enhanced Security
Default SSH configurations are often functional, but for an IoT device exposed to the internet, enhancing security is paramount. The main configuration file is `/etc/ssh/sshd_config`. Always back up this file before making changes: `sudo cp /etc/ssh/sshd_config /etc/ssh/sshd_config.bak`. Here are some critical security recommendations: 1. **Disable Password Authentication (Highly Recommended):** This forces the use of SSH keys, which are far more secure. Find `PasswordAuthentication yes` and change it to `PasswordAuthentication no`. 2. **Disable Root Login:** Prevent direct SSH login as the root user. Find `PermitRootLogin prohibit-password` or `PermitRootLogin yes` and change it to `PermitRootLogin no`. 3. **Change Default SSH Port:** While not a security measure in itself (it's "security through obscurity"), changing the default port (22) can reduce the number of automated brute-force attempts. Choose a port number above 1024 (e.g., 2222). Find `Port 22` and change it to `Port 2222` (or your chosen port). Remember to update your UFW rule if you change the port: `sudo ufw allow 2222/tcp`. 4. **Allow Specific Users Only:** If only certain users should be able to SSH in, specify them. Add `AllowUsers yourusername` at the end of the file, replacing `yourusername` with the actual username. 5. **Restart SSH Service:** After making any changes to `sshd_config`, you must restart the SSH service for them to take effect.sudo systemctl restart sshAccessing Your IoT Device Remotely
Once SSH is configured on your Ubuntu IoT device, the next step is to establish a connection from your client machine. The method varies slightly depending on your operating system, but the core SSH protocol remains the same. This section covers how to remote access Ubuntu SSH server over the internet, providing a powerful way to manage your devices.Accessing from Linux/macOS
Linux and macOS operating systems come with a built-in SSH client, making remote access incredibly straightforward. 1. **Open Terminal:** Launch your terminal application. 2. **Connect via SSH:** Use the `ssh` command with the username and IP address (or hostname) of your IoT device.ssh username@your_iot_device_ip_addressssh -p 2222 username@your_iot_device_ip_addressAccessing from Windows: PuTTY and OpenSSH Client
Windows users have a couple of primary options for SSH access: the traditional PuTTY client or the built-in OpenSSH client available in Windows 10 and later. #### Using PuTTY PuTTY is a popular, free, and open-source SSH client for Windows. 1. **Download PuTTY:** You can download PuTTY for Windows operating system from its official website. The latest version, PuTTY 0.83, is available there. Free download PuTTY for Mac and Linux versions are also available, though Mac and Linux typically use their native SSH clients. 2. **Launch PuTTY:** Open the downloaded `putty.exe` executable. 3. **Configure Connection:** * In the "Session" category, enter your IoT device's IP address or hostname in the "Host Name (or IP address)" field. * Ensure the "Port" field matches your SSH port (default 22, or your custom port like 2222). * Select "SSH" as the "Connection type." * You can save the session for future use by typing a name under "Saved Sessions" and clicking "Save." 4. **SSH Key Authentication (Recommended for PuTTY):** * If using SSH keys, navigate to "Connection" -> "SSH" -> "Auth" in the PuTTY configuration window. * Click "Browse..." next to "Private key file for authentication" and select your private key file (PuTTY requires its own `.ppk` format, so you might need to convert your `.pem` or other keys using PuTTYgen). 5. **Open Connection:** Click "Open." You'll see a security alert about the host key on the first connection; click "Accept." 6. **Login:** A terminal window will open. Enter your username and then your password (if not using keys) or your passphrase for your private key. #### Using OpenSSH Client on Windows 10/11 Windows 10 and 11 include an OpenSSH client that can be enabled as an optional feature. This allows you to use SSH directly from PowerShell or Command Prompt, similar to Linux/macOS. 1. **Install OpenSSH Client:** * Go to "Settings" -> "Apps" -> "Optional features" -> "Add an optional feature." * Find "OpenSSH Client" and click "Install." 2. **Open PowerShell/Command Prompt:** Search for "PowerShell" or "CMD" and open it. 3. **Connect via SSH:** The command syntax is identical to Linux/macOS:ssh username@your_iot_device_ip_addressssh -p 2222 username@your_iot_device_ip_addressWeb-Based SSH Solutions for IoT
While traditional SSH clients offer robust functionality, there are scenarios where accessing your IoT device directly from a web browser can be incredibly convenient. This is particularly useful for quick checks, demonstrations, or when you're on a machine without an SSH client installed. How to remotely SSH IoT device in web browser is a comprehensive guide to setting up remote IoT monitoring with SSH on Raspberry Pi, Ubuntu, and Windows. Web-based SSH solutions typically work by running an SSH client on a server (which you might host yourself or use a third-party service) that then provides a web interface to interact with your IoT device. This guide is designed to simplify this process. Common approaches include:- Self-Hosted Web Terminal: You can set up a web-based terminal emulator (like Shell In A Box or GateOne) on a server that has SSH access to your IoT devices. This server acts as a proxy, allowing you to SSH into your devices through your web browser. This offers high control but requires server management.
- Cloud-Based IoT Platforms: Many IoT cloud platforms (e.g., AWS IoT, Google Cloud IoT Core, Azure IoT Hub) offer built-in remote access capabilities, sometimes including web-based SSH or command execution interfaces. These are managed services, simplifying deployment but potentially incurring costs.
- SSH Tunneling for Web Interfaces: If your IoT device runs its own web interface (e.g., for device configuration or data visualization), you can use SSH port forwarding to securely access it through your browser. Instead of directly exposing the device's web server to the internet, you create an SSH tunnel from your local machine to the device, and then access the web interface via `localhost` on your machine. This is a very secure way to access internal web services.
Visual Studio Code Server for Remote IoT Development
For developers working extensively with IoT devices, merely having SSH access for command-line operations might not be enough. Modern development often relies on powerful IDEs (Integrated Development Environments) that offer code completion, debugging, file browsing, and integrated terminals. Visual Studio Code has revolutionized remote development with its "Remote - SSH" extension and the Visual Studio Code Server. The Visual Studio Code Server is a service you can run on a remote development machine, like your desktop PC or a virtual machine, but critically, it can also run directly on your Ubuntu IoT device. This means you can have the full VS Code experience, with all its extensions and features, directly connected to the files and environment of your remote IoT device. How it works: 1. **Install VS Code on your local machine.** 2. **Install the "Remote - SSH" extension** in VS Code. 3. **Connect to your IoT device via SSH** using the extension. 4. VS Code will automatically detect if the server component is missing on your IoT device and prompt you to install it. Once installed, VS Code will establish a connection, and you'll see your remote file system and be able to open folders, edit files, run terminals, and debug code as if it were local. Benefits for IoT development:- Full IDE Experience: Access to all VS Code features, including extensions for specific programming languages (Python, C++, Node.js), Docker, Git integration, and more.
- Direct File Access: Edit files directly on the IoT device without needing to transfer them back and forth.
- Integrated Terminal: Run commands on the remote device directly from VS Code's terminal.
- Debugging: Set breakpoints and debug applications running on your IoT device.
- Consistent Environment: Work directly within the device's environment, avoiding "works on my machine" issues.
Troubleshooting Common SSH Issues in IoT Environments
Even with careful setup, you might encounter issues when trying to establish an SSH connection to your IoT device. Here are some common problems and their solutions: 1. **Connection Timed Out / Connection Refused:** * **Firewall:** Check if UFW (or any other firewall) on your Ubuntu IoT device is blocking the SSH port. Ensure `sudo ufw allow ssh` (or your custom port) is enabled. * **SSH Service Not Running:** Verify the SSH service status on the IoT device: `sudo systemctl status ssh`. If not running, start it: `sudo systemctl start ssh`. * **Incorrect IP Address/Port:** Double-check the IP address or hostname and the port number you're trying to connect to. * **Network Connectivity:** Ensure both your client machine and the IoT device are connected to the internet and can reach each other (e.g., ping the device's IP address). * **Router Port Forwarding:** If connecting from outside your local network, ensure your router is configured to forward the SSH port to your IoT device's local IP address. This is critical for remote access over the internet. 2. **Permission Denied (Publickey) / Authentication Failed:** * **Incorrect Password:** If using password authentication, ensure you're typing the correct password. * **SSH Key Issues:** * **Key Not Added:** Ensure your public key is correctly placed in `~/.ssh/authorized_keys` on the IoT device. * **Incorrect Permissions:** The `~/.ssh` directory should have `700` permissions, and `~/.ssh/authorized_keys` should have `600` permissions on the IoT device. * **Wrong Private Key:** Ensure your client is using the correct private key for the public key on the device. * **Key Passphrase:** If your private key has a passphrase, ensure you're entering it correctly. * **`PermitRootLogin no`:** If you're trying to log in as root, remember that it's often disabled for security. Try logging in as a regular user. * **`AllowUsers` Restriction:** If you've configured `AllowUsers` in `sshd_config`, ensure your username is listed. 3. **Host Key Verification Failed:** * This usually happens if the IP address of your device has changed, or if you've reinstalled the OS on the device. Your client's `known_hosts` file (typically `~/.ssh/known_hosts` on Linux/macOS, or PuTTY's registry entries) stores the device's fingerprint. * **Solution:** Remove the old entry for that IP address from your `known_hosts` file. On Linux/macOS, `ssh-keygen -R your_iot_device_ip_address`. For PuTTY, clear the host key cache in its configuration. 4. **Slow Connection / Lag:** * **Network Latency:** High latency between your client and the IoT device can cause lag. * **DNS Resolution:** If using a hostname, slow DNS resolution can delay connection. Try connecting via IP address. * **Device Load:** If your IoT device is under heavy load, its SSH server might respond slowly. By systematically checking these common issues, you can often quickly diagnose and resolve SSH connectivity problems, ensuring reliable remoteiot web ssh download ubuntu access.Conclusion: Mastering Remote IoT Monitoring
The ability to securely and efficiently manage your Internet of Things devices remotely is no longer a luxury but a fundamental requirement in today's interconnected world. By leveraging the power of SSH on robust operating systems like Ubuntu, you gain unparalleled control over your IoT ecosystem, enabling seamless monitoring, maintenance, and development from virtually anywhere. We've explored the critical role of SSH in securing your remote connections, highlighted Ubuntu's strengths as an IoT OS, and provided a step-by-step guide to setting up and utilizing SSH, including options for web-based access and advanced development environments like Visual Studio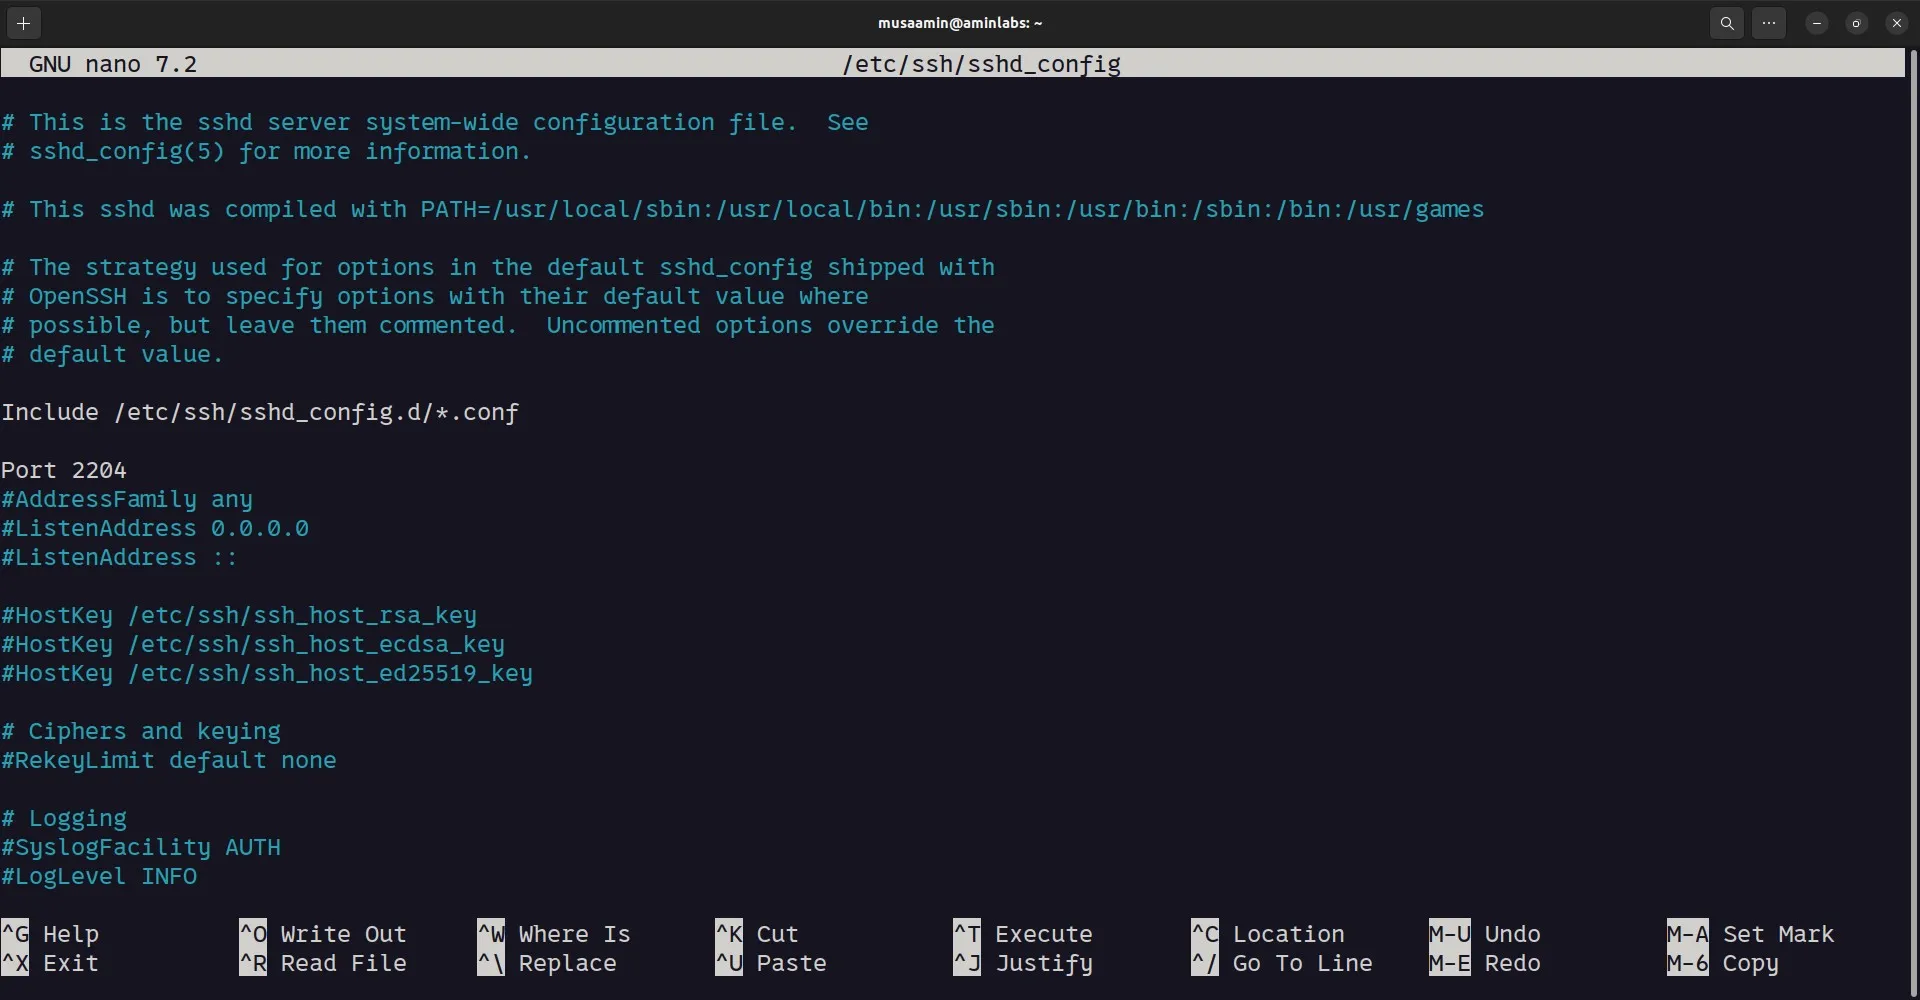
Detail Author:
- Name : Timothy Kris DDS
- Username : cassin.jeremy
- Email : cremin.clarissa@gibson.com
- Birthdate : 1972-07-02
- Address : 140 Eleanora Lodge Heatherland, TX 43794-3480
- Phone : (817) 517-7554
- Company : Gutmann, Lakin and Kessler
- Job : Freight Agent
- Bio : Qui perspiciatis illo possimus in necessitatibus laboriosam qui. Asperiores quis magni sit soluta et nihil sit. Id autem laudantium at expedita sed. Praesentium incidunt quia optio sunt eum.
Socials
facebook:
- url : https://facebook.com/maryjane5763
- username : maryjane5763
- bio : Eligendi repudiandae consequatur reprehenderit perferendis.
- followers : 4274
- following : 632
tiktok:
- url : https://tiktok.com/@kiehn1998
- username : kiehn1998
- bio : Magnam quia rerum odit fuga asperiores.
- followers : 1794
- following : 1584
instagram:
- url : https://instagram.com/kiehn2017
- username : kiehn2017
- bio : Beatae doloremque voluptatem dolores. Et non ex maxime commodi. Iure et nam vel quia in.
- followers : 5547
- following : 57
